Tutorial 8 - Making it Smooooth
So far, our application has been relatively simple - displaying GUI widgets, calling a simple third-party library, and displaying output in a dialog. All these operations happen very quickly, and our application remains responsive.
However, in a real world application, we'll need to perform complex tasks or calculations that may take a while to complete - and as those tasks are performed, we want our application to remain responsive. Let's make a change to our application that might take a little time to complete, and see the changes that need to be made to accommodate that behavior.
Accessing an API
A common time-consuming task an app will need to perform is to make a request on a web API to retrieve data, and display that data to the user. Web APIs sometimes take a second or two to respond, so if we're calling an API like that, we need to ensure our application doesn't become unresponsive while we wait for the web API to return an answer.
This is a toy app, so we don't have a real API to work with, so we'll use a sample API endpoint as a source of data. If you open https://tutorial.beeware.org/tutorial/message.json in your browser, you'll get a JSON payload with a message.
The Python standard library contains all the tools you'd need to access an API. However, the built-in APIs are very low level. They are good implementations of the HTTP protocol - but they require the user to manage lots of low-level details, like URL redirection, sessions, authentication, and payload encoding. As a "normal browser user" you're probably used to taking these details for granted, as a browser manages them for you.
As a result, people have developed third-party libraries that wrap the built-in APIs and provide a simpler API that is a closer match for the everyday browser experience. We're going to use one of those libraries to access the {JSON} Placeholder API - a library called httpx. Briefcase uses httpx internally, so it's already in your local environment - you don't need to install it separately to use it here.
Let's add a httpx API call to our app. Modify the requires setting in our pyproject.toml to include the new requirement:
requires = [
    "faker",
    "httpx",
]
Add an import to the top of the app.py to import httpx:
import httpx
Then modify the say_hello() callback so it looks like this:
async def say_hello(self, widget):
    fake = faker.Faker()
    with httpx.Client() as client:
        response = client.get("https://tutorial.beeware.org/tutorial/message.json")

    payload = response.json()

    await self.main_window.dialog(
        toga.InfoDialog(
            greeting(self.name_input.value),
            f"A message from {fake.name()}: {payload['body']}",
        )
    )
This will change the say_hello() callback so that when it is invoked, it will:
- make a GET request on the JSON placeholder API to obtain post 42;
- decode the response as JSON;
- extract the body of the post; and
- include the body of that post as the text of the "message" dialog, in place of the text generated by Faker.
Lets run our updated app in Briefcase developer mode to check that our change has worked. As we've added a new requirement, we need to tell developer mode to reinstall requirements, by using the -r argument:
(beeware-venv) $ briefcase dev -r

[helloworld] Installing requirements...
...
[helloworld] Starting in dev mode...
===========================================================================
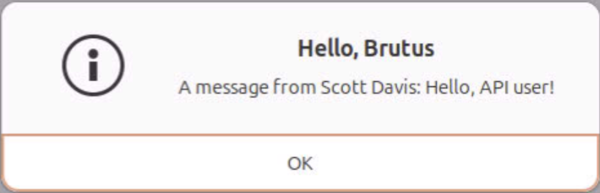
When you enter a name and press the button, you should see a dialog that looks something like:
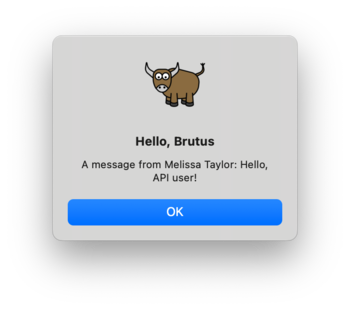
(beeware-venv) $ briefcase dev -r

[helloworld] Installing requirements...
...
[helloworld] Starting in dev mode...
===========================================================================
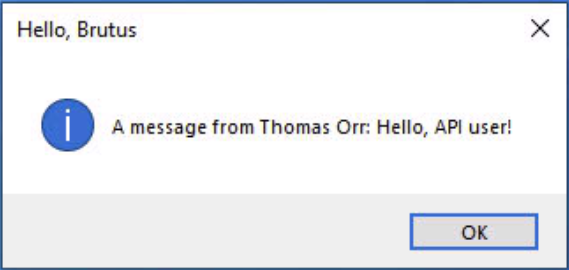
When you enter a name and press the button, you should see a dialog that looks something like:
(beeware-venv) C:\...>briefcase dev -r

[helloworld] Installing requirements...
...
[helloworld] Starting in dev mode...
===========================================================================
When you enter a name and press the button, you should see a dialog that looks something like:
You can't run an Android app in developer mode - use the instructions for your chosen desktop platform.
You can't run an iOS app in developer mode - use the instructions for your chosen desktop platform.
Unless you've got a really fast internet connection, you may notice that when you press the button, the GUI for your app locks up for a little bit. The operating system may even manifest this with a "beachball" or "spinner" cursor to indicate that the app is being unresponsive.
This is because the web request we have made is synchronous. When our application makes the web request, it waits for the API to return a response before continuing. While it's waiting, it isn't allowing the application to redraw - and as a result, the application locks up.
GUI Event Loops
To understand why this happens, we need to dig into the details of how a GUI application works. The specifics vary depending on the platform; but the high level concepts are the same, no matter the platform or GUI environment you're using.
A GUI app is, fundamentally, a single loop that looks something like:
while not app.quit_requested():
    app.process_events()
    app.redraw()
This loop is called the Event Loop. (These aren't actual method names - it's an illustration of what is going on using "pseudo-code").
When you click on a button, or drag a scroll bar, or type a key, you are generating an "event". That "event" is put onto a queue, and the app will process the queue of events when it next has the opportunity to do so. The user code that is triggered in response to the event is called an event handler. These event handlers are invoked as part of the process_events() call.
Once an app has processed all the available events, it will redraw() the GUI. This takes into account any changes that the events have caused to the display of the app, as well as anything else that is going on in the operating system - for example, the windows of another app may obscure or reveal part of our app's window, and our app's redraw will need to reflect the portion of the window that is currently visible.
The important detail to notice: while an application is processing an event, it can't redraw, and it can't process other events.
This means any user logic contained in an event handler needs to complete quickly. Any delay in completing the event handler will be observed by the user as a slowdown (or stop) in GUI updates. If this delay is long enough, your operating system may report this as a problem - the macOS "beachball" and Windows "spinner" icons are the operating system telling you that your app is taking too long in an event handler.
Simple operations like "update a label", or "recompute the total of the inputs" are easy to complete quickly. However, there are a lot of operations that can't be completed quickly. If you're performing a complex mathematical calculation, or indexing all the files on a file system, or performing a large network request, you can't "just do it quickly" - the operations are inherently slow.
So - how do we perform long-lived operations in a GUI application?
Asynchronous programming
What we need is a way to tell an app in the middle of a long-lived event handler that it is OK to temporarily release control back to the event loop, as long as we can resume where we left off. It's up to the app to determine when this release can occur; but if the app releases control to the event loop regularly, we can have a long-running event handler and maintain a responsive UI.
We can do this by using asynchronous programming. Asynchronous programming is a way to describe a program that allows the interpreter to run multiple functions at the same time, sharing resources between all the concurrently running functions.
Asynchronous functions (known as coroutines) need to be explicitly declared as being asynchronous. They also need to internally declare when an opportunity exists to change context to another coroutine.
In Python, asynchronous programming is implemented using the async and await keywords, and the asyncio module in the standard library. The async keyword allows us to declare that a function is an asynchronous coroutine. The await keyword provides a way to declare when an opportunity exists to change context to another coroutine. The asyncio module provides some other useful tools and primitives for asynchronous coding.
Making the tutorial asynchronous
To make our tutorial asynchronous, modify the say_hello() event handler so it looks like this:
async def say_hello(self, widget):
    fake = faker.Faker()
    async with httpx.AsyncClient() as client:
        response = await client.get("https://jsonplaceholder.typicode.com/posts/42")

    payload = response.json()

    await self.main_window.dialog(
        toga.InfoDialog(
            greeting(self.name_input.value),
            f"A message from {fake.name()}: {payload['body']}",
        )
    )
There are only three changes to this callback from the previous version:
- The client that is created is an asynchronous
AsyncClient(), rather than a synchronousClient(). This tellshttpxthat it should operate in asynchronous mode, rather than synchronous mode. - The context manager used to create the client is marked as
async. This tells Python that there is an opportunity to release control as the context manager is entered and exited. - The
getcall is made with anawaitkeyword. This instructs the app that while we are waiting for the response from the network, the app can release control to the event loop. We've seen this keyword before - we also useawaitwhen displaying the dialog box. The reason for that usage is the same as it is for the HTTP request - we need to tell the app that while the dialog is displayed, and we're waiting for the user to push a button, it's OK to release control back to the event loop.
It's also important to note that the handler itself is defined as async def, rather than just def. This tells Python that the method is an asynchronous coroutine. We made this change back in Tutorial 3 when we added the dialog box. You can only use await statements inside a method that is declared as async def.
Toga allows you to use regular methods or asynchronous coroutines as handlers; Toga manages everything behind the scenes to make sure the handler is invoked or awaited as required.
If you save these changes and re-run the app in development mode, there won't be any obvious changes to the app. However, when you click on the button to trigger the dialog, you may notice a number of subtle improvements:
- The button returns to an "unclicked" state, rather than being stuck in a "clicked" state.
- The "beachball"/"spinner" icon won't appear.
- If you move/resize the app window while waiting for the dialog to appear, the window will redraw.
- If you try to open an app menu, the menu will appear immediately.
We can now run the full app. However, as we've added an extra requirement (httpx) we also need to update our app's requirements; we can do this by passing -r to briefcase run. This will update our app's requirements, then re-build the app, then launch the app:
(beeware-venv) $ briefcase run -r
(beeware-venv) $ briefcase run -r
(beeware-venv) C:\...>briefcase run -r
(beeware-venv) $ briefcase run android -r
(beeware-venv) $ briefcase run iOS -r
You should see you app running, and remaining responsive when you press the button and network content is retrieved.
Next steps
This has been a taste for what you can do with the tools provided by the BeeWare project. Over the course of this tutorial, you have:
- Created a new GUI app project;
- Run that app in development mode;
- Built the app as a standalone binary for a desktop operating system;
- Packaged that project for distribution to others;
- Run the app on a mobile simulator and/or device;
- Run the app as a web app;
- Added a third-party dependency to your app; and
- Modified the app so that it remains responsive.
So - where to from here?
- If you'd like to go further, there are some additional topic tutorials that go into detail on specific aspects of application development.
- If you'd like to know more about how to build complex user interfaces with Toga, you can dive into Toga's documentation. Toga also has its own tutorial demonstrating how to use various features of the widget toolkit.
- If you'd like to know more about the capabilities of Briefcase, you can dive into Briefcase's documentation.